So much has been done!
With the help of some very dedicated community gardeners, the gallery site has undergone big changes this week! The old cinder blocks have been removed. Once those were removed, we were able to weed, rake and till the old beds to create a new level base for the new beds. Now, we must pause for the construction of the beds and the delivery of the soil.
Tomorrow's work day is postponed until the beds are built and we are ready to fill them with soil and plantings.
Thank you to everyone who volunteered to come out. I will let you know when the next workday is as soon as it is scheduled.
Things are happening and it is exciting!

Friday, April 29, 2011
Tuesday, April 26, 2011
Getting Wiggly with It!
Houston, we have a problem; a compost problem.
I have been composting for years. There are many things I can say about the many benefits of composting. But, for me, it's simply a great way to get good, free soil. And, when you aspire to have an entire yard full of beautiful things other than red clay, good, free soil is very good thing.
The problem? I have been warned by several fellow beekeepers, who have been beekeeping for a lot longer than I have, that composting and beekeeping don't mix. Composting leads to higher levels of bugs, namely small hive beetles, which are a major pest. If left unchecked, they can kill a strong colony of bees. So, what's an avid composter, lover of free dirt, to do? Get worms.
I have been putting this off for years. I have always thought it would be fun to do with the kids. But, I have beenunmotivated lazy and well, if it ain't broke don't fix it, right? It broke! Here's how I fixed it and how you can, too. For $30 and in under 30 minutes, I built a worm bin.
Materials:
Then what?
What do you do if your worms try to escape the first night like mine did?
I have been composting for years. There are many things I can say about the many benefits of composting. But, for me, it's simply a great way to get good, free soil. And, when you aspire to have an entire yard full of beautiful things other than red clay, good, free soil is very good thing.
The problem? I have been warned by several fellow beekeepers, who have been beekeeping for a lot longer than I have, that composting and beekeeping don't mix. Composting leads to higher levels of bugs, namely small hive beetles, which are a major pest. If left unchecked, they can kill a strong colony of bees. So, what's an avid composter, lover of free dirt, to do? Get worms.
I have been putting this off for years. I have always thought it would be fun to do with the kids. But, I have been
Materials:
- 3 10-gallon dark plastic storage bins ($5 each for Sterilite brand.)
- Drill with 1/4 inch and 1/16 inch bits
- 2 packages of Red Wigglers (or Eisenia Foetida for you science people) from Angler's Corner in Doraville. They are $5 per package. Ideally, you want 1/2 to 1 pound. I have no idea how much I bought. Two packages seemed like a good start. You can also buy them online for a small fortune. Your best bet is to Google for them in your area. Regular garden worms are not suitable for vermicomposting.
- Newspaper
- Cardboard
- Food scraps
 |
| Three 10 gallon bins. |
 |
| Drill about 20 1/4 inch holes around the bottom of two of the bins. |
 |
| Drill 1/16 inch holes around the tops of all three bins. Note: my 1/16 inch drill bit snapped right off while drilling a hole. So, I used 1/8 inch bit. Don't do this. As your folks always said, "Do as I say, not as I do." Why? Because the baby worms can wiggle their way out of the 1/8 inch holes. |
 |
| Close up. |
 |
| Now, drill 1/16 inch holes all over one of the tops. Again, do as I say, not as I do. |
--> At this point, you should have three bins. One bin still has a solid bottom. Two bins have holes drilled into the bottoms. One lid has ventilation holes drilled into it.
 |
| Take one of the bins with holes drilled into the bottom and fill it about 6 inches high with 1-inch strips of newspaper, fluffed up. |
 |
| Wet with water and squeeze excess out. Re-fluff. (That is the technical term.) Add some leaves to the mix if you want. |
 |
| Add your Red Wigglers to the damp newspaper/leaves. My worms came packed in this soil mix. I added both the worms and the soil mix to the newspaper/leaf mix so they would feel right at home. |
 |
| Cover the whole bin with a damp piece of cardboard. |
 |
| Now, set the bin with the worms inside of it into the bin with the solid bottom. Cover with the lid that has the ventilation holes drilled into it. Done. The third bin, also with holes drilled into the bottom of it, is going to hang out for a little while, but will be needed in a few months. |
Then what?
- Place the bin outside in the shade or, get this, in your house under the kitchen sink, in the laundry room or basement or in the garage. Composting doesn't get much more convenient than that!
- Feed your worms. You do this by burying the food scraps. Each week, bury the scraps in a new area of the bedding and cover it back up with cardboard.
- When the container is full and food scraps can no longer be seen in the bedding, it is time to introduce the third bin. Add newspaper bedding in this container like you did when you set up your original bins. Now, place this inside the bin that currently contains the worms right on top of the worms and bedding mix. Add new scraps into the new bin. The worms will migrate from the old bin into this new bin through the holes drilled into the bottom. The black/brown stuff left in the original bin is what you are after- vermicompost, worm castings, "black gold."
- The liquid, or worm tea, that is in the bottom container is also excellent to use in your garden.
- Vegetable and fruit scraps (You do not need to chop these up. That is the whole point of letting the worms do the work!)
- Tea bags (not the plastic ones!) and coffee ground and filters
- Cereal
- Bread
- Grains
- Crushed egg shells
What do you do if your worms try to escape the first night like mine did?
- Check your bedding. It may be too wet or too dry. Or, they need more bedding. Or, if the bedding is all used up and all you see is black/brown vermicompost/castings, it's time to harvest. Worms don't like living in their castings.
- Add a light to keep them contained. Worms live in the soil. They don't like light. I placed the bin under the outside light and left it on all night and they got the point and settled down.
Thursday, April 21, 2011
Onions: Cooking past the Moment
I mentioned earlier this week that I spent the weekend clearing the old and planting the new in the garden. When I cleared the beds, I pulled out a decent number of spring onions. I pulled them out first thing and then left them in piles in the grass near the beds for the whole day. I did not bring them inside until almost nightfall. Shame, shame! In my own defense, it was a very busy day which included helping a neighbor with a new landscaping plan and participating in a bee hive inspection with the kids at Dunwoody Nature Center. When I (finally) got around to bringing them in, they were wilted and I didn't quite know what to do with them (yet), so I stuck them in a wash pan in the sink with about an inch of water. And, there, I left them. This was on Sunday. When I got around to thinking about them again, it was Tuesday. Oddly, upon inspection, they looked fantastic!
So, I got busy with the business of making something of them. On a quest for the perfect recipe, I turned to a new cookbook in my collection that I can't seem to put down, Cooking in the Moment: A Year of Seasonal Recipes by Andrea Reusing. It took me no time to find it, Onion-Braised Overnight Brisket. With only 7 ingredients, each individual flavor is sure to shine. Perfect. At this point, I would like to mention the fact that, as a household, we do not eat much red meat. We have a couple of family members with high cholesterol, so when we have red meat, it is a real treat. Paired with the fresh from thegarden wash pan onions, this certainly would be a treat. And, I was off!
After seven hours of low-and-slow roasting, I challenge you to get this beef to the table without nibbling first. It is simply impossible. It comes out fork tender like I have never experienced before, absolutely delicious flavor -not one single flavor dominates but they are all there and beautifully balanced- and moist as can be. There is a whole bit about doing something with the onions to make a sauce, but I did not get that far. I tore into this thing with my bare hands while still in the pot and never looked back (at the recipe, that is). Wow. I realize this sounds a bit primitive, but I would just like to point out that I am anemic. So, that is, at least, partially to blame. I think. Or, maybe not. People, it was good! What can I say?
I would also like to mention that the cookbook author, the clearly talented Andrea Reusing, will be cooking at Watershed on Sunday, May 1st. I would love to attend. But, my usual dinner date will be somewhere that is not here that evening. Therefore, I may not. Plus, I get this thing near great chefs. I have a long history of being a mediocre-at-best home cook. I have never poisoned anybody (that I know of) but it sure feels like I've come close a few times. Right now, I am sure my Dad would like to chime in with a vegetarian pizza story from when I was a sophomore in high school that I will never live down. It was not clear to me at such a tender age that a head of garlic was different than a clove. When, the recipe for a single pizza called for 10 or 20 or 40 cloves (who can remember?), I substituted heads of garlic. The bottom line is, because of my sordid past in the kitchen, anytime I am near such culinary genius, I get strange. In the event that you are not similarly afflicted and you would like to attend, here are the details:
 |
| No longer wilted. Nice and firm, not soggy. |
So, I got busy with the business of making something of them. On a quest for the perfect recipe, I turned to a new cookbook in my collection that I can't seem to put down, Cooking in the Moment: A Year of Seasonal Recipes by Andrea Reusing. It took me no time to find it, Onion-Braised Overnight Brisket. With only 7 ingredients, each individual flavor is sure to shine. Perfect. At this point, I would like to mention the fact that, as a household, we do not eat much red meat. We have a couple of family members with high cholesterol, so when we have red meat, it is a real treat. Paired with the fresh from the
 |
| All pretty and clean. |
 | |
| Sliced and ready to be sauteed. But, now, they must wait again while I tend to the meat. |
 |
| Garlic, rough chopped. You add the salt and chop until it forms a paste. |
 |
| You rub the paste all over the non-fatty side of the brisket and sprinkle it with pepper. Then, roll it up, tie it with twine and sear it on all sides. |
 |
| Saute the onions with a little salt, sugar and oil. |
 |
| Add the beef brisket to the onions and add a cup or so of water. |
 |
| Make a blanket of parchment to capture the steam and keep it moist while it cooks. |
 |
| Put it in a low oven (225 degrees) for 7 hours. That's right, seven hours. |
I would also like to mention that the cookbook author, the clearly talented Andrea Reusing, will be cooking at Watershed on Sunday, May 1st. I would love to attend. But, my usual dinner date will be somewhere that is not here that evening. Therefore, I may not. Plus, I get this thing near great chefs. I have a long history of being a mediocre-at-best home cook. I have never poisoned anybody (that I know of) but it sure feels like I've come close a few times. Right now, I am sure my Dad would like to chime in with a vegetarian pizza story from when I was a sophomore in high school that I will never live down. It was not clear to me at such a tender age that a head of garlic was different than a clove. When, the recipe for a single pizza called for 10 or 20 or 40 cloves (who can remember?), I substituted heads of garlic. The bottom line is, because of my sordid past in the kitchen, anytime I am near such culinary genius, I get strange. In the event that you are not similarly afflicted and you would like to attend, here are the details:
Andrea Reusing comes to Watershed to promote her new book, Cooking in the Moment
The dinner will take place on Sunday, May 1 at 6:30 p.m. and will include six courses plus wine for $125. Tax and gratuity is included. For reservations, call Watershed at 404-378-4900.
Finally, if you would like to preview the cookbook, you can do so here.
Wednesday, April 20, 2011
Spruill Gallery Garden - Help, Do, Teach
This is the method my Grandmother used to teach my Mom how to prepare a Thanksgiving feast. When the time came, my Mom used it to teach my sister and I. First, you help someone else prepare one. Next, you're on the hook to create the meal, from start to finish, with help from Mom, of course. Finally, you teach someone else how to do it because it reinforces what you've learned and you are not likely to forget what you've taught.
This method can also be applied to gardening. The Spruill Gallery Garden is a great opportunity to learn how to garden. And, it is an equally great opportunity for you veteran gardeners out there to teach someone else what you know about gardening. There will be folks out there at all levels. The funny thing about gardening is you can be helping, doing and teaching all at the same time! There is always something new to be learned. So, come on out and join the fun!
This is a call for volunteers!
Installation is scheduled for early May. There is much to do before then.
Come for as long or as little as you can. Just come!
As a bonus, those who volunteer will get first dibs on the old cinder blocks that will be removed from the old beds. They will be given away for FREE! These blocks are great to use as a stable base to raise a rain barrel off the ground, to border a garden or create a green wall, to build a firepit or compost bin or even to elevate a bee hive. I have even seen one crafty person turn a cinder block into an attractive bird house.
As a bonus, those who volunteer will get first dibs on the old cinder blocks that will be removed from the old beds. They will be given away for FREE! These blocks are great to use as a stable base to raise a rain barrel off the ground, to border a garden or create a green wall, to build a firepit or compost bin or even to elevate a bee hive. I have even seen one crafty person turn a cinder block into an attractive bird house.
Work Day Schedule:
Prep Day - Monday, April 25th, 9 am - 1 pm
Prep Day - Friday, April 29th, 9 am - 1 pm
Prep Day - Saturday, April 30th, 12 noon - 4 pm
Prep Day - Friday, April 29th, 9 am - 1 pm
Prep Day - Saturday, April 30th, 12 noon - 4 pm
Location:
4681 Ashford Dunwoody Road
Atlanta, Georgia 30338
Atlanta, Georgia 30338
Please email me at shawnbard@gmail.com if you are able to help or if you have any questions!
Accidents Happen, Beauty Results
I adore Biokovo Geranium. In truth, I love all the hardy geraniums. But, there is something about the quiet beauty of Biokovo. I mean, look at this:

It reminds me of attentive little girls in tutus just waiting to dance. I have this all around, here and there. It divides easily and spreads readily.
This spring, I noticed some had spread from a large patch I have around my strawberry bed over to a Kim's Knee High Echinacea. And, this is the result:

Dainty little blossoms dancing below a hot pink sun.
Tuesday, April 19, 2011
So Much Excitement!
Warning, what you are about to read will contain the word "excitement" or variants of the word excitement such as "excited" and "exciting" more times than is healthy for any human being to read let alone write. Additionally, the following text will contain so many exclamation points that you will wonder if the author has completely lost it. Wonder no more! She has! Thankfully, for you, she is not too excited for words. She has managed to retain the ability to write, albeit not well. (snicker, snicker)
Many weeks ago, I posted about Smart Pots. These things really ARE smart! I got so excited about these things that I fired off an email to the company asking them if they would be interested in donating some pots to our community so folks can get a little taste of gardening this season. These pots are ideal for anyone who wants to try gardening on a small scale. But, what is really great about them is that they are light and portable and you can also use them on a balcony or in very small spaces. This means even more people can try vegetable gardening. It's no longer limited to those with large yards. Wouldn't you know it? They said, "Sure! In fact, we'll give you 50." I was electric, I was so excited! It was like opening the best, most-desired present on Christmas morning!
When I calmed down from my excitement high, I called Farmer D and asked them if they would be willing to donate soil to a project that would enable folks to get a taste of gardening this season. I told them how I would love to give 50 tomato transplants away in Smart Pots so people can experience, first hand, the amazing flavor of a vine ripe tomato they they, themselves, grew. Would you believe me if I told you they also agreed? I hope so, because they did.
Feeling like I was on a streak, I made another call to Home Depot and asked for tomato stakes for this project. Again, they said yes. (It has just occurred to me that perhaps I should have bought a lottery ticket.)
Finally, starting to feel like I might be pushing my luck, I called our PTA President, Susan Tallent, and explained to her what I was hoping to accomplish and asked if the Vanderlyn PTA would like to host the event at the school in conjunction with the school's Organic Garden Committee and she said yes.
So, I got busy growing 50 tomato seedlings in my dining room.


Now, the dates are set and it's actually happening!
At this time, the event is open to Vanderlyn families. There will be two workshops. Each workshop is open to 25 people. Sign ups are first come, first served. At the end of the workshop, participants will receive a Smart Pot filled with Farmer D's organic soil, a tomato transplant and a growing stake.
The dates are as follows:
Tuesday, May 10th, 2:45 PM @ Vanderlyn Garden
(Children enrolled in after-care will be able to participate with parents' approval.)
Saturday, May 14th, 11 AM @ Vanderlyn Garden
Did I mention I am excited?
Trellis: If You Build It, They Will Grow
This weekend, I readied the beds - cleaned, tilled, amended - and planted. I put in a few transplants. Mostly, I planted seeds. There is just something about seeds. I love watching their progress as they peek out from the dirt, unfurl and reach for the sun. But, I am in that period of time where you just don't know. It could go either way. A week from today, I might have tiny bits of green, two little leaves, a start. Or, maybe there will be nothing and I'll have to decide if I will wait a little longer or call it a mulligan get to the business of re-seeding. Only time will tell. This situation is exacerbated by the fact that my cats were running wild in the beds as I was trying to plant. Who knows what's even left in there to sprout?
One area I will be watching closely is the row of cucumbers. These are one of our favorite summer crops. There is just nothing quite like a homegrown cucumber on a hot summer day. I know the same can be said of many vegetables. This, I might add, is how I wound up with half a yard dedicated to vegetables and why I am still looking to expand. Still, the whole family gets into the cukes. The kids, after running around in the yard, will yank them straight off the vine and eat them while sitting on the swings. With so many people vying for the cucumbers, it's hard to grow enough. And, this leads to issues. Last year, I grew the cukes up tomato cages, two stacked on top of each other and zip tied together. It worked, but they were not very stable. This year, I have decided to try what I hope will be a better method, a dedicated trellis. Here is how I made one and how you, too, can make one for very little money (think $20-$25 depending on whether you already own a hacksaw or if you'll need to spend $5 to buy one) and an hour or so of time.
Materials to build a trellis:
10' lengths of 1/2 inch conduit ($2.18 each, number will depend on finished trellis size.)
2 -1/2 inch elbows ($3.14 each)
4 -1/2 inch set screw couplings ($1.53 for 5)
2 -1/2 inch two hole straps ($.84 for 4)
Trellis netting ($3.97)
Tools:
Sharpie Marker
Tape Measure
Hacksaw with metal cutting blade, 18 tooth
Scissors
Here's what most of this will look like:
 |
| Do not ask me why, but I bought four elbows. You only need two. |
Step 1: Determine how large you want your trellis to be and mark the side pieces with a Sharpie.
 | |
| I have these in this yellow guide so you can see the markings. You don't need it for cutting. |
Step 2: Using your hacksaw with the metal cutting blade, saw the pieces one at a time.
 |
| This is after I cut both of my pieces to size. |
Step 3: Attach the elbows using the couplers.
 |
| First, feed the side piece into one end of the coupler and tighten the screw. Then, feed the elbow piece into the other end of the coupler and tighten that screw. |
Step 4: Cut the top bar to length.
Step 5: Add the top bar of the trellis using the remaining two couplers.
 |
| Once you have added the top bar, this is what your corners will look like. |
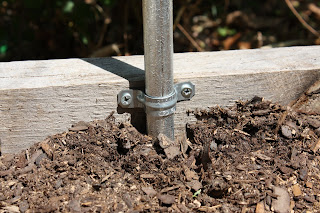
Step 6: Now, because I am not Bob Villa (or even Handy Manny- although it would be awesome if my tools would magically begin guiding me!) and because I have been known to get the math all wrong, this is the perfect time to take it down to the bed and make sure it all fits. So, this is what I did. After you determine that it does, you want to secure it to the bed using the straps.

Step 6: Remove the top bar leaving the elbows attached to the top bar and feed it through the trellis netting.

Step 7: Tie the trellis netting to the sides and you are done!


Now, all I need are the cucumbers!
Soul Food
On Thursday, my day started with the following text at 8:23 AM:
"Hey girls! Mom, N and I are gardening today! Feel free to come by anytime! :-) xoxxoxoxox"
This was no ordinary invitation to help a friend plant her vegetable garden.
This came from a very dear friend, a woman who was instrumental in helping me get back to life when I was at my lowest. She has a sweet disposition and a nasty habit of pushing you whether you like it or not. And, I love her for it and always come back for more because sometimes she knows I am ready before I know I am ready. She's my boot camp instructor. This time, it was her turn. She was waiting for the call. Her call would bear the results from a biopsy of a mass in her lung.
When I got the text, I knew what I would do that day regardless of what I might have had planned. I would do whatever it took to make this beautiful person less uncomfortable while she waited for the phone to ring. And so, I got my gloves, got a drink and got myself over to her house as fast as I could.
We spent a quiet morning planting seeds and veggies, talking, laughing, distracting, waiting and silently worrying. In the end, when the call came in, it was just the two of us in the car on our way to buy materials to build a trellis. This was huge for me. When it was my turn, when I was the one waiting, I was alone when the call came in even though my husband made every effort to be with me when the phone rang. He took the day off from work and was by my side most of the day. It was in a 5 minute stretch when I ran out to pick up the kids that the phone finally rang. Now, I can see it was symbolic. While my husband grieved the loss of our son as much as I did, the physicality of losing our unborn child was mine to bear alone.
In this case, I was so honored to be in my friend's space when her phone rang. I was honored to be holding my breath right along side her as she answered and heard. I was honored to be sharing hugs and tears when the news was good. And, it was good. I am so grateful.
She may not realize it, but she gave me the most amazing gift that day. When she asked me to help her plant her veggies, it was my soul that grew. She gave my experience a different purpose and a new meaning. While our circumstances were different, the process was strikingly similar. It truly is incredible to be able to dig in to the parts that still hurt, find the good and use it to support someone else. I am thankful that I was able to share in her journey so intimately and come out with a strength I didn't know I had. Thank you, dear friend. I can't wait until you are running me ragged again when you are recovered and ready!
 |
| Planting seeds and veggies in raised beds while we wait. |
Monday, April 11, 2011
What's your sign?
Do you believe in signs?
Today, on this anniversary of sorts, I can firmly say that I do.
It has been one year since the day I received the call that our son, our unborn son, still safely tucked inside, had Down syndrome. Shortly before the complication that led to further testing, I was celebrating the fact that we had made it through the first trimester and that the pregnancy was likely to last. This was cause for celebration because the two pregnancies immediately prior had ended in miscarriage. And, then, the news. At the time, I remember thinking it was devastating, that we would have to come to grips with it. I was full of fear. And, it was just the beginning.
The news led to further testing, genetic testing, that my husband and I had never had done before. But, now, we were being tested. And, all the while, we were having weekly ultrasounds because our son had health issues beyond his bonus chromosome. It didn't take me long to realize that Down syndrome was not going to be the toughest challenge our son faced. In fact, his challenges would be immense. And then, he was gone. Six short and difficult weeks later.
The day we lost our son, I received another call. I had already begun to dread the phone ringing and avoided it at all costs. It was our genetic counselor again. This time, she was calling to let me know that my Tay-Sachs test result had come back and that there was a very strong possibility that I am a carrier. And, that my husband would need to be tested right away. I barely remember this call. I was very upset over the loss of our baby and was given medication by my doctor. I had never taken anything like this before and it made me very groggy. The call came during my slumber. Later in the day, when I woke up, I couldn’t be sure it had actually happened. The caller ID made it a reality.
I called the counselor back to hear it again, to be sure I had it right. The issue with the Tay-Sachs results was terrifying. Our genetic counselor explained that if I am a carrier and my husband is a carrier, then there was 25% chance that our living children, the very breath of me, my heart and soul, could have late onset Tay-Sachs, a debilitating, ultimately fatal, neurological disease. This may not seem like much of chance. But, we had landed on the slim end of so many statistics that I was genuinely, truly terrified.
I left town. I went to my mom and dad’s house. I retreated. My husband got his blood drawn and made his way there, too. I had no idea when I would return. I had no idea how I would make it through the day. Then, the results came back. My husband was a carrier, too.
This did it. I came back to Atlanta to learn what we needed to do next to get the answers we needed. One option was to have the kids tested. But, I knew I could not do that. I knew I could not sit and wait for that call to come in again. The other option was to have more invasive DNA mapping done on my husband and I which would not only tell us definitively if we are carriers, but it would tell us which tiny portions of our DNA carried the disease. This, I could do. The problem was the wait. There are only a few labs in the country that perform this level of testing. Thankfully, one was Emory. Unfortunately, the wait was one year. One year of waiting, wondering, torture.
Our genetic counselor is a miracle worker and managed to work it out with the lab. We would get our blood drawn in her office and they would courier it to Emory and then she would deliver our results when they came in. It would take 3 months.
Our summer went on. I started to feel stronger. I worked in the garden. I made plans. I prayed. I bargained. I begged. I wanted a sign. I remember one very specific occasion where I literally crouched in the garden, sobbing, shattered, and begged for a sign that everything would be okay. It didn’t seem to come. But, I still believed it would. I steadied myself and continued to wait for it.
At the end of the summer, we made a trip up to Martha’s Vineyard to spread our son’s ashes. He now rests amidst the sand, surf and sun in one of the most beautiful places in the world to me, the Children’s Memorial at the Edgartown Lighthouse. Ironically, this is the very spot where my husband proposed to me many years ago. Back then, we could not have imagined that this would also be the site where we would visit our son for the rest of our lives. At the time, it was just a pretty lighthouse. During our marriage, the lighthouse had undergone restoration and it was made into a memorial. Sometimes, I can't help but wonder at the string of ironies and coincidences.
Upon landing in Atlanta on our return, literally, I turned on my phone while taxying to our gate and it immediately rang. My heart sank when I saw who it was. It was the genetic counselor. Again. Her timing, impeccable. I answered and got the news that we were in the clear. The carrier testing was wrong. We were not carriers. Our children would grow old. We would watch it all. I was relieved.
Time kept going. Some days were hard. Some days less so. I didn’t know what would be next. There would be no baby. There would be something though. I didn’t know what. But, I continued to believe. So, I continued to get out of bed. Then, I decided to start living again. I enrolled in the Master Gardener program. I started to say yes again. Yet, I still wanted a sign. Something to let me know I was on the right path, that I was making the right choices. I needed more than just my instincts and my belief.
A few weeks ago, an opportunity arose. The Spruill Art Gallery is installing a vegetable garden. They needed someone to lead it. I considered it. I agreed to meet with Pattie Baker at the site to assess what would need to be done. You cannot get to the garden without passing a sign. It is large. It is not hidden. It is in plain sight, facing the main road. And, yet, if you can believe it, I had never noticed it before. There was no missing it on this day. My path led me straight to it.

I finally got my sign. And, so, of course, I said yes! Archie, my sweet boy, this one’s for you!
Friday, April 1, 2011
Spruill Gallery gets a garden.
It's April 1st, is this tomfoolery? No, it is not! And, I could not be more excited!
Read about it here and here. Pattie Baker and Bob Lundsten, along with Spruill Art Gallery's Hope Cohn, are the think tank behind this great idea.
Beginning right now, right this very second, I am leading an initiative to launch and run the planned vegetable garden at the Spruill Gallery in Dunwoody, GA. And, I need your help! There are so many ideas flowing, it is hard to know where to start.
Oh, wait. I know. We need to start with the basics. We need bodies and we need money.
We need to raise at least $3000 during the month of April, or this garden will not happen.
Please, if Spruill has done good things for you, for your kids, for your families, over the years (yes, I am talking to you, remember that time our kids did camp together at Spruill? Or the jewelery making class you took?), now is your chance to give back to Spruill. This is a unique opportunity to do something new and innovative in our community. It's art. It's food. It's green. It's happening NOW. And, you can be a part of it.
Donate by sending a check to: Spruill Gallery, 4681 Ashford Dunwoody Road, Dunwoody, GA 30338. Be sure to write in the subject line that it is for the garden. (A Paypal option should be live in about a week.)
The garden is scheduled to be installed May 2. An art opening for an installation titled Architecture in the Garden is scheduled for June 2.
The FULL File: Baby, meet Honey
Here's another fun use for those delicious baby Vidalia onions should you have some handy. This recipe stems from a sort-of challenge in my own mind with my husband. The evening before, we were discussing the bees. Of course, I was animated and excited. He was dozing off. Something, I can't image what, inspired me to ask my husband if he even likes honey. He responded quickly with, "Oh my yes! I just love honey to bits! I'm not sure. When do I even eat honey? What is it in?" Say what? I saw this as a challenge and an opportunity to enlighten my husband to the wonders of honey. And, since we know he digs onions and I still had four left, I decided to go that route. I was already planning on serving chicken in a teriyaki marinade and being a person who loves a theme, I decided to stick with Asian. So, I immediately thought soy sauce. And, then for reasons unknown to me, I thought lemons and rice wine vinegar. It helped that I had them on hand and was determined to avoid a trip to the grocery store. Now, I also thought sriracha, ginger and garlic, but there it got complicated so I stopped. As with anything that comes out of my brain and results in food, this can be tweaked to no end to make it even better if you have the talent and fearlessness. So go for it! This is what I ended up with:
Honey and Soy Glazed Roasted Broccoli and Baby Vidalia Onions
serves 4
1 head of broccoli
4 baby Vidalia Onions
2 tablespoons of good honey, local if possible
1 tablespoon of rice wine vinegar
2 tablespoons of lite soy sauce
1/4 lemon, juiced
2 tablespoons extra virgin olive oil
sea salt
pepper
Honey and Soy Glazed Roasted Broccoli and Baby Vidalia Onions
serves 4
1 head of broccoli
4 baby Vidalia Onions
2 tablespoons of good honey, local if possible
1 tablespoon of rice wine vinegar
2 tablespoons of lite soy sauce
1/4 lemon, juiced
2 tablespoons extra virgin olive oil
sea salt
pepper
- Preheat oven to 450 degrees.
- Trim the stalks (the green parts) off the onions leaving about 4 inches. Cut the onions in half lengthwise.
- Chop the broccoli however you like.
- Put the broccoli and onions on a baking sheet. Drizzle the broccoli and onions with olive oil. Sprinkle with sea salt and pepper.
- Combine the honey, soy sauce, rice wine vinegar and lemon juice and mix well. This would also be a good time to add any spices like garlic, ginger, crushed red pepper flakes, a hit of hot sauce, lemon peel, etc. You get the idea.
- Pour this over the broccoli and onions and shake them in the pan to get decent coverage on the vegetables.
- Roast in the oven for 15 minutes, tossing them around about half way through.
 |
| A tiny jar of honey I received as a gift for participating in the Metro Atlanta Beekeeper's Short Course in January. It has been waiting for a special occasion. I think this qualifies! |
 |
| The broccoli and the onions, prepped. |
 |
| On the pan, dressed and headed into the oven. |
 |
| Dinner is served! |
Subscribe to:
Posts (Atom)